
How to Clean an NES 72 Pin Connector: A Step-by-Step Guide
The Nintendo Entertainment System (NES) holds a special place in the hearts of many gamers as an iconic console that ushered in a new era of gaming. However, like any piece of technology, the NES requires proper maintenance to ensure optimal performance. One common issue with the NES is dirty, worn out or corroded 72 pin connectors, which can lead to frustrating gameplay experiences. Fortunately, cleaning the 72 pin connector is a relatively simple process that can breathe new life into your beloved console. In this guide, we'll walk you through the steps to effectively clean your NES 72 pin connector.
This process listed in this guide is the exact same process that we use at Retro Replay to ensure that all of the NES consoles we sell are in the best possible working order that we can make them. When you buy an NES, or any console or game, from Retro Replay, you can be assured that we take pride in the time and effort that we put into cleaning, testing and refurbishing all of the consoles and products we sell.
FIRST UNPLUG YOUR NES CONSOLE FROM ANY POWER SOURCE
Step 1: Gather Your Supplies
Before you begin cleaning your NES 72 pin connector, gather the necessary supplies:
- Isopropyl alcohol (preferably 90% or higher concentration)
- Cotton swabs (Q-tips)
- Toothbrush
- A clean, soft cloth
- A micro flathead screwdriver (You can get away with a larger gauge sewing needle if or small pick if necessary)
- Philips head screwdriver (+ head screwdriver)
Step 2: Prepare Your Workspace
Find a clean, well-lit area to work in. Make sure you have enough space to comfortably disassemble and clean your NES console. Make sure you have a tray, bowl or glass to keep your screws inside of. A couple sheets of paper towel is also a good idea in case you have to clean up any spilled alcohol.
Step 3: Removing the NES 72 Pin Connector
To access the 72 pin connector, you'll need to remove the cartridge slot from your NES console. Start by flipping the console upside down and removing the six screws that around the edges of the underside of the console. There should be one in each corner and then one in the bottom middle and top middle of the bottom. When you have done this the console should separate into two sections. Take the top half of the shell and set it off to the side. You do not need it until reassembly, unless you'd like to clean it before putting it back together.
Next turn the bottom of the console right side up and have a look at it. You will see a large metal RF shield covering most of the inside of the console. You have to remove this to access the 72 pin connector. Using this image below, remove all the screws that are in the areas circled in red. The one screw, located farthest back in the top right corner, just to the left of the power and AV ports, is not totally necessary to remove, but it is safe to do so, because it allows you to move the circuit board later on.
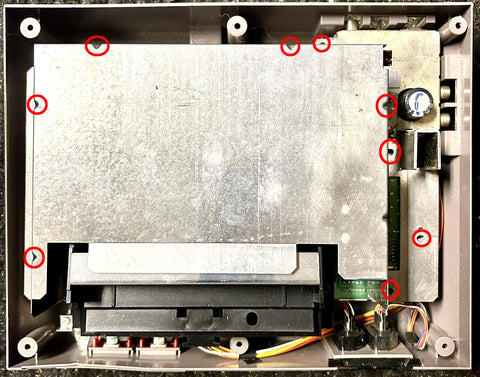
Once you have removed the screws in the red circles you should be able to easily remove the RF shield. If you notice on the right, top and left side there are these little tiny holes. These are guide holes. This is where the RF shield goes when you put it back together. If you line up these three little holes when reassembling things will go a lot smoother and faster.
You can take the screws that you removed from the RF shield and mix them with the case screws from earlier. All the screws in this guide are exactly the same except two, which are silver and longer, so mixing up these is fine for now.
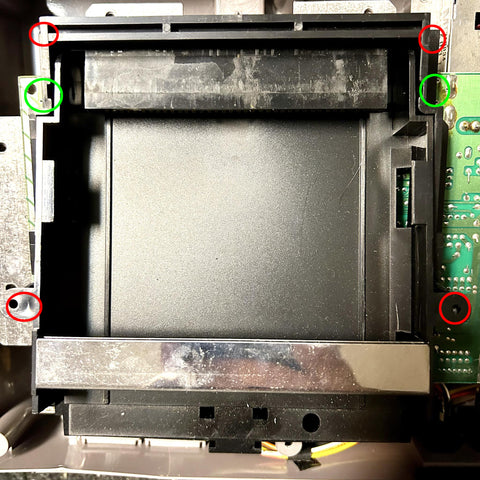
With the RF shield fully removed you will see the black cartridge tray and the circuitry underneath. What you need to do next is remove the screws circled in red and green from the following image. The screws circled in green are the silver longer screws that was noted above. Those you should keep separate from the other screws as they can only go back into the same spot they were removed from.
Once you remove the screws and have them safely off to the side it is now time to remove the cartridge tray. This can be a little bit tricky, however because we removed that extra screw in the top right cover by the power and AV ports, so it should be fairly simple. What you need to do is pull the black cartridge tray forward just a little bit, because if you notice you will see that there is a tiny lip on the bottom of it that goes under the circuit board. You need to pull it forward just enough to get that lip to clear the board and then lift it up and away from the circuit board. If this is your first time, this may be a bit finicky, but once you do it, you'll know exactly how it works for future maintenance and repair.
With the cartridge tray removed you will see just the NES 72 pin connector left on the console. It should look like this.
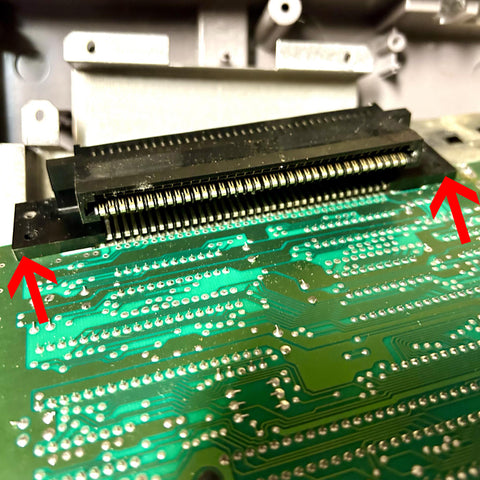
The red arrows indicate where to put pressure on the NES 72 pin connector to remove it. Push it straight back from the corner edges. If this is the first time the connector has been removed there is a good chance that it is going to be on there good. You might have to walk it off the back by moving one side at a time until it is totally free. Just take your time and make sure to only push backwards. You do not want to put any excess stress on the circuit board.
When you get the NES 72 pin connector removed you should have a board that looks like this.
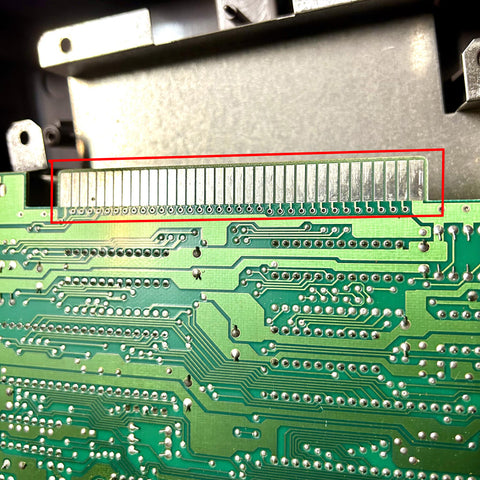
The area circled in red is where the 72 pin connector attaches to the console. Remember the orientation of the connector before you put it back onto the console after cleaning it because you do not want to attempt to put it on upside down.
With the 72 pin connector removed, take a minute and clean the circuit board where the connector attaches to the console. Just get a cotton swab saturated with some isopropyl alcohol and scrub the connection on the board. Do this for about 30 seconds to remove any contaminants and then flip the cotton swap to the other side to polish the area and dry it off.
Step 4: Clean the 72 Pin Connector
Once the cartridge slot is removed, you'll have access to the 72 pin connector. Dip a cotton swab in isopropyl alcohol and gently rub it along the metal contacts of the 72 pin connector. Be thorough but gentle to avoid damaging the connector. Repeat this process with clean cotton swabs until no more dirt or grime is visible on the swabs.
You can also use a clean toothbrush to do this to agitate any contaminants. However be aware that the bristles of the brush can get caught in the pins and pull them out of place. It is in your best interest to make sure that you take your time and be cautious in this step.
Step 4a: Resetting the 72 Pin Connector to Factory Specifications
Do step 5 before this step if you feel that this optional step is necessary.
This is an optional step, however at Retro Replay we always perform this step. By doing this we can ensure that the console will play just as it did from factory as much as possible.
Take your micro flat head screwdriver, small pick or sewing needle and insert it at the edge of the NES 72 pin connector's metal pins. The place you want to insert it is right at the edge of the little black dividers and the metal pins. When you touch the pins you can see they are easy to bend, so take your time and do not be forceful.

As you can see in the picture above the small pick is in between the metal pin and the plastic. Slowly, and very carefully, maneuver your tool under the metal pin and slightly bend it upwards so that it is about 1mm above the plastic. DO NOT BEND IT TOO HIGH UP. If you bend it too high up it will make the cartridge very hard to insert and remove and can damage the cartridge. So you only want to have it just a tiny fraction above the black plastic to the left and right of it.
Repeat this step on each one of the pins until you have them all level and equally raised up together. You can test the connector on a game cartridge if you are concerned about it being too snug at this point if you would like.
Step 5: Dry the Connector
After cleaning the 72 pin connector, use a dry cotton swab or a clean, soft cloth to carefully dry any remaining alcohol residue. Ensure the connector is completely dry before reassembling your NES console. If you have compressed air or an air compressor available use that to blow into all the nooks and crannies in the 72 pin connector to ensure that it is totally dry.
Step 6: Reassemble Your NES Console
Once the 72 pin connector is clean and dry, carefully slide it back onto the circuit board in the reverse manner that you removed it. Then follow the same steps noted above in reverse.
When putting the black cartridge tray back on MAKE SURE THAT YOU HAVE THE LIP UNDERNEATH THE CIRCUIT BOARD. This is crucial. If you do not have that little lip underneath the circuit board when sliding it back in before screwing it down, the tray will not be seated correctly and it will cause stress on the circuit board and your games will not seat correctly. It will make it so that the cartridges cannot be pushed down when inserting them into your NES. So do not skip this step. It is a little bit finicky to do, but should only take 30 seconds to a minute of adjustments to get it to slide on so that you can screw it down.
Note that you do not need to over tighten anything. Hand tight is totally fine. Do not over tighten the screws. Also make sure to put the longer silver screws into the correct spots circled in green in the image above.
Step 7: Test Your NES Console
With the cartridge slot reinstalled, test your NES console with a game cartridge to ensure the 72 pin connector is functioning properly. If the game boots up without any issues, congratulations – you've successfully cleaned your NES 72 pin connector!
NOTE: If your game does not work in the pushed down position, try and leave it in the up, non pushed down, position and turn on the console that way. If you have over-lifted the pins when resetting them, this can cause this phenomenon, where the game only plays in the up position. This will not damage or cause any issues, just that the pins are too tight and should be adjusted when you get a chance. If the game is very hard to push in or remove then you should disassemble your NES and push the pins down lower until they are closer to the factory height of about 1mm above the black plastic fins that flank them. Too tight, as noted above, can cause damage to cartridges.
Please make sure to use only clean cartridges in your NES to test it out. You can clean the pins on the cartridge with the same process you did to clean the circuit board attachment area for the NES 72 Pin connector you did earlier. All NES cartridges purchased from Retro Replay have been fully cleaned and tested to make sure they work as close to brand new as they possibly can.
Cleaning the 72 pin connector of your NES console is a straightforward process that can help resolve common gameplay issues caused by dirty or corroded connectors. By following the steps outlined in this guide, you can prolong the life of your NES console and continue enjoying your favorite classic games for years to come. Happy gaming!